Replica (Sort of) of Gemma Jackson Car!
The first model in our 1957 Ford Victoria Project will be a replica of the Gemma Jackson Ford as it was delivered in late 1956 (with the exception of the presentation of the Ford McCullough Supercharger engine option). With ready access to the full-scale car, and with all the rich detail revealed by the 2012-2014 tear down and restoration, this model will present a scale miniature built, hopefully, to a much higher level of craftsmanship and detail that I was capable of doing in 1978.
My deep interest in building an authentic model of a 1957 Ford Victoria was enabled by legendary modeler Rick Reichardt who seemingly knew nearly everything about 1957 Fords. Please check out my tribute to Rick, as well as a personal note from Dean Milano:
Tribute to Rick Reichardt, by Mark S. Gustavson
After I had built my first Club Victoria model, a highly-knowledgeable 1957 Ford authority and modeler of no mean talent – Rick Reichardt – wrote to me and offered both kudos and critiques of my first Club Vicky model. I was intrigued by his suggestions (and agreed with them all); we developed a good friendship that lasted until Rick died about a decade ago.
Rick was a source of enormous knowledge and offered to me copies of selected Ford dealer sales sheets, and data plate “rubbings” as well as his own drawings of mechanical, styling and interior details of these great cars.
Unfortunately, Rick’s models and incredible research disappeared soon after his passing meaning that other than a correspondence record, almost nothing remains of his knowledge, tremendous modeling skills, and his now widely-dispersed, partially-finished scale models.
As I recall, Rick owned a ‘57 Country Sedan station wagon and he enjoyed the fact that I purchased my 1:1 Club Victoria in 1989.
As a tribute to Rick, please check out the following items that Rick sent me over the years. RIP, Rick!
Rick was a stickler for details. Someone needs to compare this information to the new Revell 1957 Ford Custom body. I have dozens of pages like this one in my private collection – all from Rick!
Another example of Rick’s incredible research, as applied to 1/25 scale models. Rick was a genuine expert on these cars.
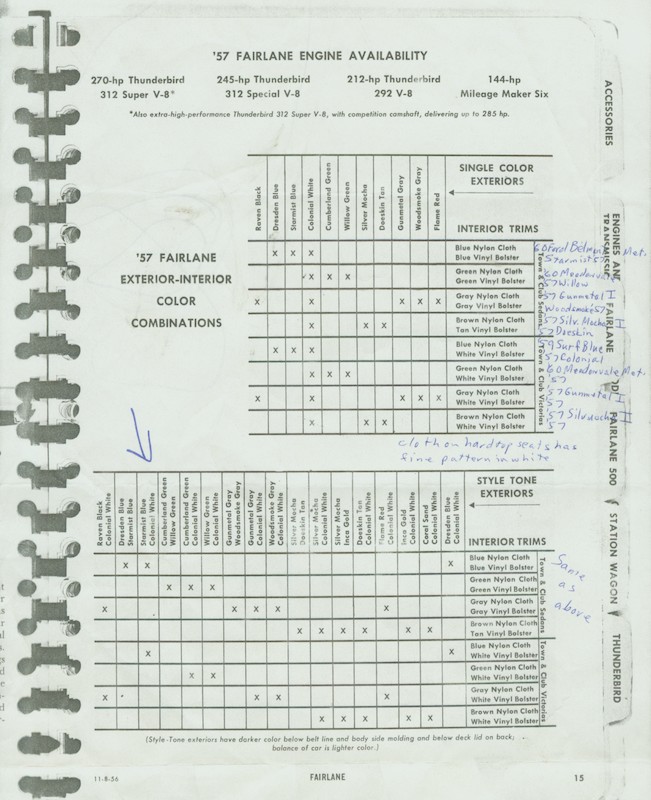
Rick had also collected a significant number of original Ford dealer and production binders and the like all of which gave evidence of equipment levels, and which exterior colors were coupled with which interior upholstery combinations.
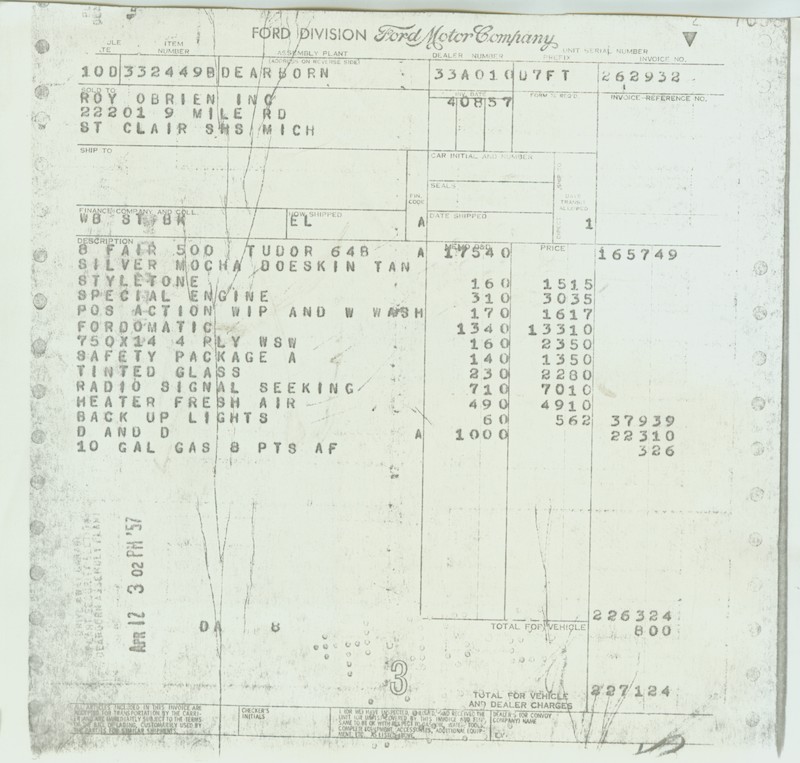
I don’t know where Rick found them, but he had a substantial collection of original dealer sales invoices for specific 1957 Fords. This is one of a dozen or so copies of such invoices that he sent to me.
Rick had a profound interest in four-door 1957 Fords, as well. Here’s a 1981 drawing he sent to me of a Fordor. Note the exquisite details.
Rick also had an amazing and enormous collection of original factory manuals – often production documents were used by the factory and dealers to market the cars.
Old and great friend Dean Milano was also a close friend of Rick’s, and Dean has offered these recollections which I quote verbatim:
“Rick Reichardt was a perfectionist to the point that he rarely completed a model. They just never got to the level where they were meeting his high standards and he would inevitably move onto new projects out of frustration.
I remember when he showed me a workbench filled with half-done conversion projects. I was taken aback by the fact that each conversion body had only one side finished. It was almost as if, once he had met the challenge of the conversion and finished one side, he lost interest and couldn’t bring himself to complete the model.
He did finish at least one model however, and that was the 1957 Ford Custom Tudor. It was spot on regarding the wheelbase, etc., and apparently he was happy with that one, as he eventually cast it in resin. He made quite a few copies, although I’m not sure if he sold any. I found it to be a very accurate body and it’s the one I based my ’57 Canadian Meteor on.
Rich was a feisty fellow and he was known to butt heads with a lot of people, but he was a good guy and I surely miss him.”
My scale replica of the Jackson car will benefit from a fair degree of scratch building, a handful of machined parts, seat decals sourced through Mark D. Jones, a lot of photoetched parts, and a few detail parts liberated from a discarded 1/25 scale Danbury Mint 1957 Ford Retractable Skyliner diecast. Those scratchbuilt, specially-sourced parts from specialty-contractors, and sourced-from-kits, parts will permit the construction of a model that probably could not have been built 35 years ago even if I – or any other builder – had then understood that scale authenticity requires that miniature automobiles need to be built, in large measure, the way their 1:1 counterparts are built. I once thought that the creation of an “image” was enough to convince the eye and viewers (including judges) that a great and authentic scale model has been built.
That view is substantially mistaken – a lot of small parts can be built these days that look all the world like actual scale miniatures of full-scale parts. For a tome that lays out my theories about how top-shelf should be built, please go here for a chapter from a book, How To Build Championship Scale Vehicles, Construction Considerations of Building Championship-Caliber Models, that Bob Wick that Bob Wick and I wrote in 2009. You can download the entire book, for free, by going here:
The paint will be shot in vintage DuPont acrylic lacquer mixed many years ago by Byron Bowman, proprietor of Superior Paint Supply in Salt Lake City. Cobalt-plated brass bumpers will be used along with many dozens of specially-made photoetched nickel and brass parts. Bob Wick, our Project artist and illustrator, will be creating the photoetched artwork for these parts which will be digitalized and prepared for photocutting by Gary Kulchock – a top competitor at the GSL International Scale Vehicle Championship and Convention.
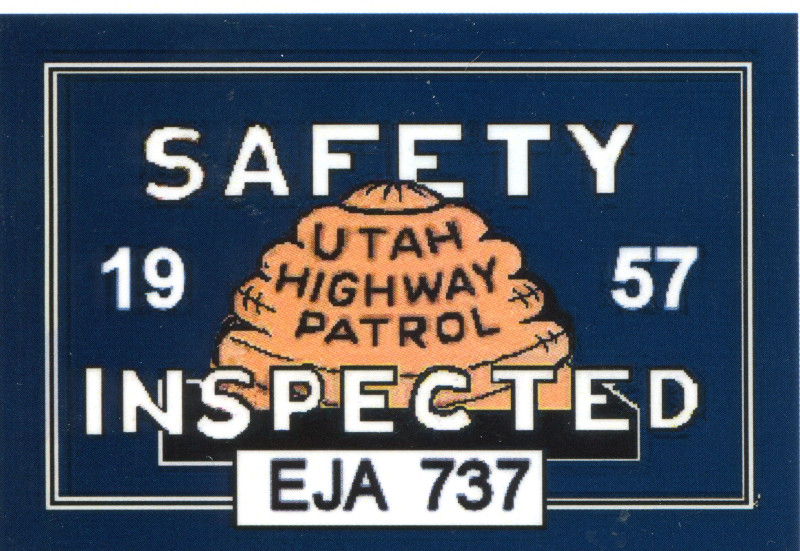
I’ll be commissioning famed decal designer and artist Mark D. Jones to create a series of scale engine compartment (and interior) decals based upon, both, scans of 1:1 factory decals and photographs. As well, Mark will be replicating the 1957 Utah Safety Inspection Sticker that will be placed inside the front driver’s windshield; interestingly, I attempted to create such an authentic sticker (circa 1978) that I painted, in reverse, inside the windshield of the 1978 model. Again, it was okay for the time, but not up to standards these days.

To be as authentic as possible, I’ll be relying upon the information and measurements revealed by the 2013 – 2014 tear down of my 1:1 Club Victoria. Check out the following description (and photos) of the various elements of the car:
Engine:
There have been many kit-based Y Blocks in the past, from the iconic AMT 1956 and 1957 Ford kit, the 1957 AMT T-Bird kit, and the Revell 1956 Ford pickup kits and others. Before the excellent new Revell 1957 Custom 300 kit, that company’s 1956 Ford pickup kit featured the best engine though that’s stretching the language to call it a good representation of a Y Block. The new (2013) Revell 1957 Ford Custom kit has a very good rendition of the engine, but it needs work to be presentable for serious competition in a top-flight contest. Here’s a list of all 1/25 Boyd list of y block kits that modeling legend and prolific writer Tim Boyd has prepared. Thanks, Tim, for this historic kit information!
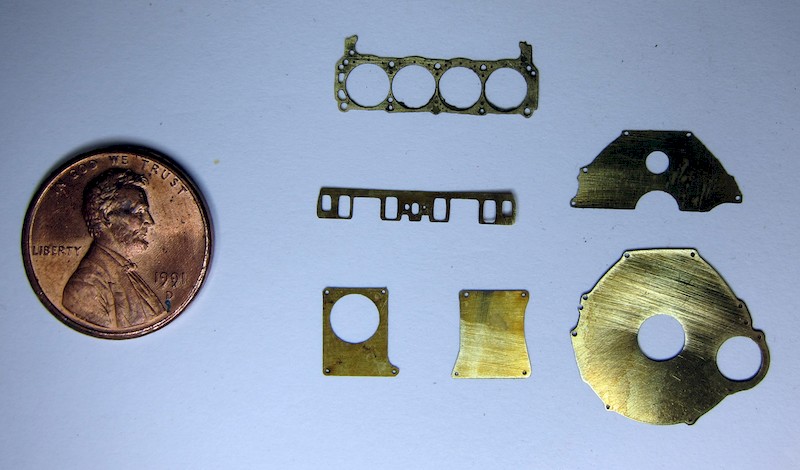
Starting with the new Revell kit short block engine, we’re going to scratch build better heads and an intake manifold, valley cover, the unique exterior oiling system, and other details using Steve Roullier’s photoetched “fascia” pieces for the mating surface on the back of the block, the face and back surface of the bellhousing, the leading face of the three-speed transmission, and mating surfaces for both the intake and intake ports of the heads and other areas: Steve scans1:1 parts or dimensioned photos, creates digital art for those mechanical surfaces, and photoshops the images in their final size(s) and then photo etches those parts in .015 brass. Steve’s parts will be used to create hyper-realistic engine parts.
Once all the engine parts are finished, they’ll be sent to The Modelhaus for resin-casting. The creation of these authentic scale miniature Y-Block parts will permit the use of ultra-delicate and totally in-scale bolts from Bob Breslauer and Bob Bentley. This all means that I can write a promised article for Scale Auto on building an authentic 1/25 scale Y Block engine.
I will be creating a full range of parts to build the McCullough supercharged engine option for the 312 Y-Block. Though the Revell kit does a good job of giving the builder some of the fundamental parts, a lot of sophisticated work needs to be undertaken to properly present an authentic scale blower motor. I’ve acquired a vintage ‘57 Ford supercharger manual (that covers the different McCullough set ups for the Thunderbird and Ford application).

This manual presents a series of exploded parts drawings and detailed illustrations. Even with a wealth of photos available of superchargers installed in Fords, I don’t think a correct 1/25 scale blower motor could be built without this manual. If you can’t find one of a rare and now-expensive original manual, they have been reprinted and are available for sale online. In addition to the two tantalizing photos below, you can soon go to the supercharger galley for many dozens of photos.
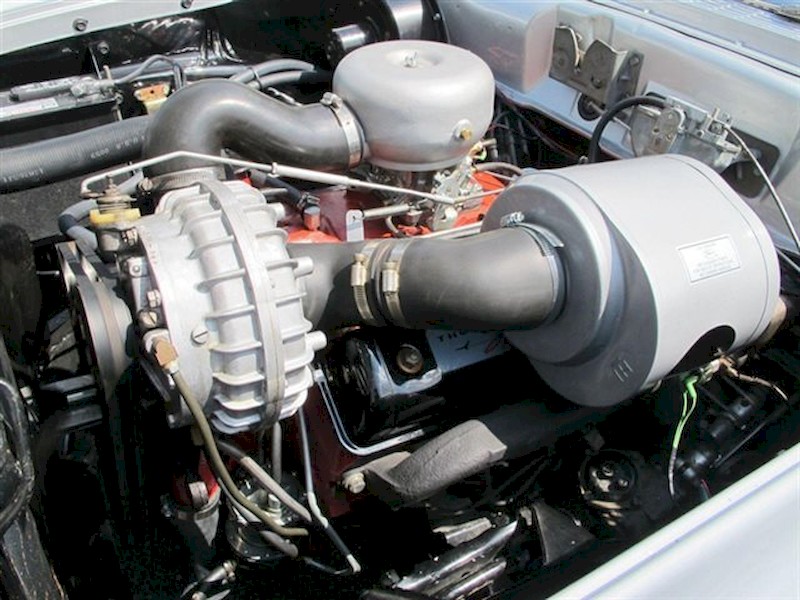
The carb “hat,” aircleaner box, hoses, oil lines and the like must all be authentically replicated to present a convincing blower motor. One of the most difficult parts to make is the weird Holley “teapot” carb that Ford used with the blower system.
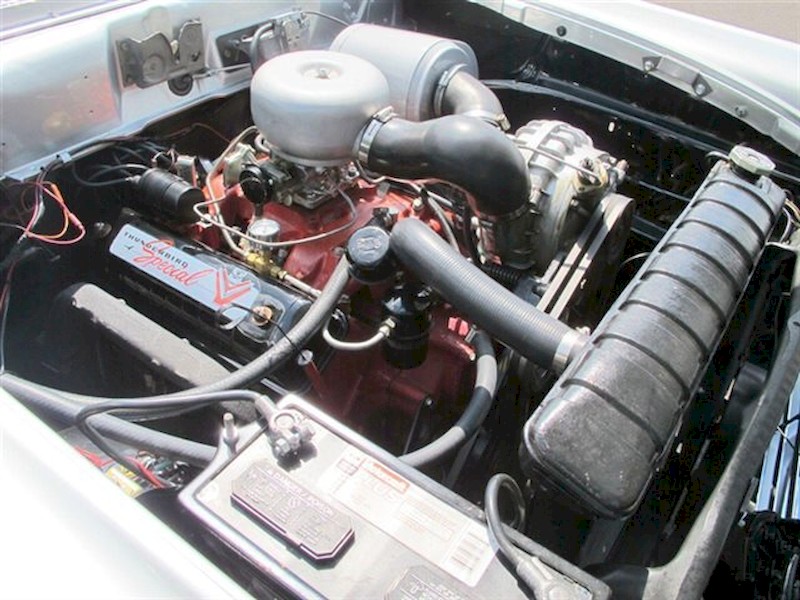
The aircleaner on the T-Bird is mounted on the passenger side as distinct from this Ford setup. Some of the fittings must be in brass, a double-belt pulley must be made, and other details (including a wild throttle system) must be fabricated.
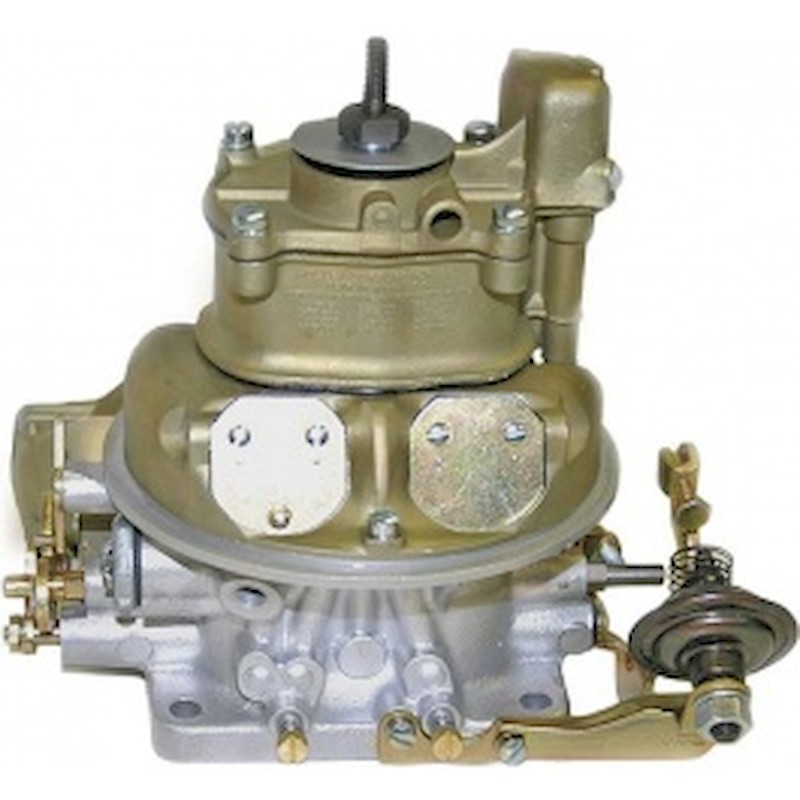
This Holley carb is odd looking and certainly not generally recognized. Building a scale version of this carb will be a challenge! I may have to find a dysfunctional 1:1 carb so I can model it.
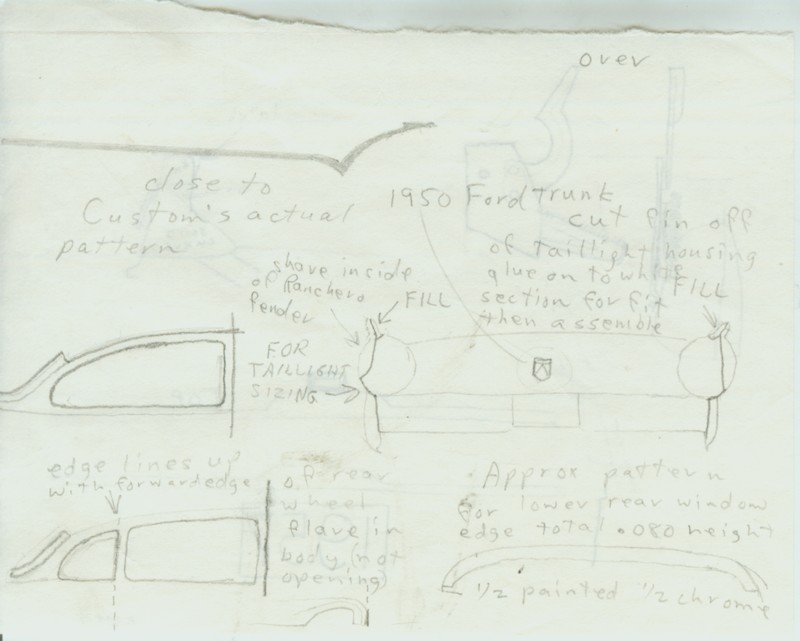
Another bit of history: One of the carbs that could be found on a ‘57 Y-Block was the Ford 4100 series four-barrel carburetor. Though little known, ‘57 Ford literature makes it clear that the Ford “Autolite” carb was used in early-production models which the Jackson Vicky is. Previously, famed machinist Cody Grayland created master brass parts for this carb which Norm Veber has cast in resin. This carb will be used on the restyled ‘57 Vicky styling study.
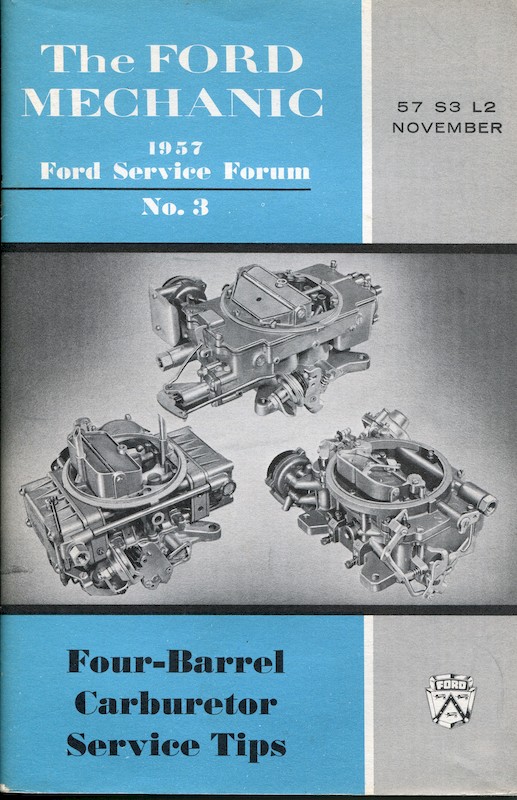
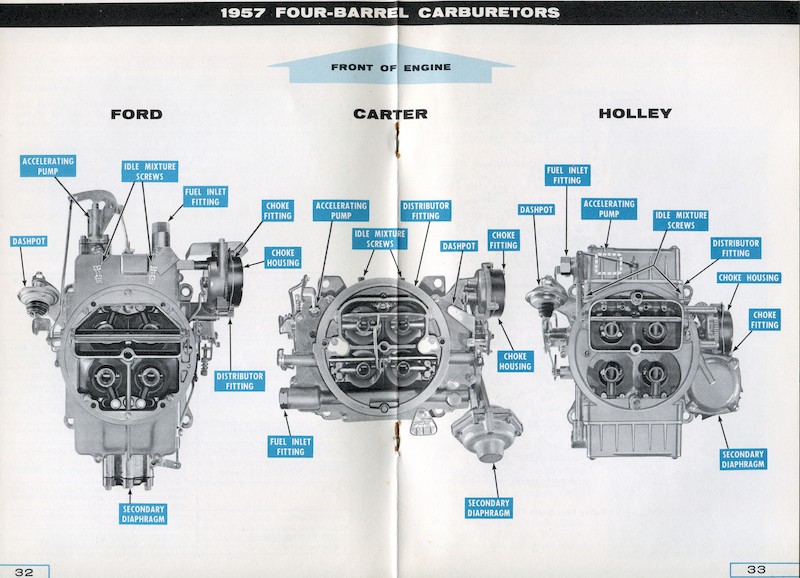
This vintage, early-production (late 1956) Ford Motor Company booklet makes it clear that Ford offered three different four-barrel carbs on its passenger cars in addition to the infamous “teapot” carbs that were used on the dual four barrel and supercharged engines. I purchased off Ebay an exceptionally rare 1.19 venturi Ford 4100 originally installed on the high-performance 1958 Mercury engine – we’ll be using this carb on the 1:1 Jackson car. Cedric Ozminski welded up one flaw, and Mike Smith restored it to full function! A scale machined 4100 carb-created by Cody Grayland will be installed on the factory stock intake.\
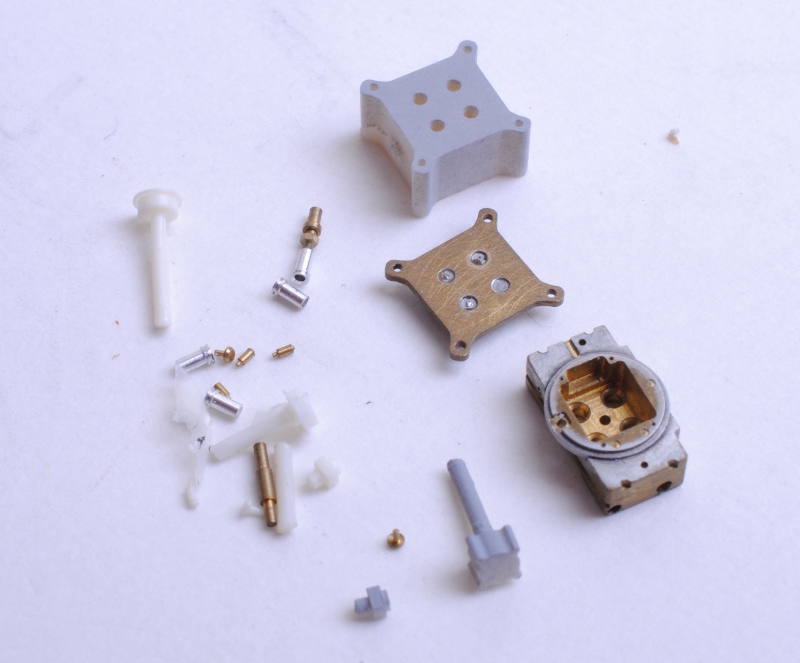
Cody’s original machined and soldered master parts are incredible and have been faithfully resin-copied by Norm Veber. Many additional parts need to be made and the carb will be actually bolted to the intake manifold again using Breslauer’s bolts.
Basic Engine Cleanup and Details:
After the engine was entirely disassembled, it was taken to a machine shop for clean up and machining. Years of grime were boiled away, and individual oil passages were laboriously cleaned (the Y block was notorious for poor oiling caused by clogged oil passages). The block was bored .030, machined on all surfaces to “true” the block, new cam bearings were installed as well, and the heads were ported and extrude-honed. The heads were gasket matched, with hardened valve seats. Ultimately, when the decision was made to overtly “hot rod” the Vicky engine, the heads were ported to match the Mummert intake and the Sanderson headers.
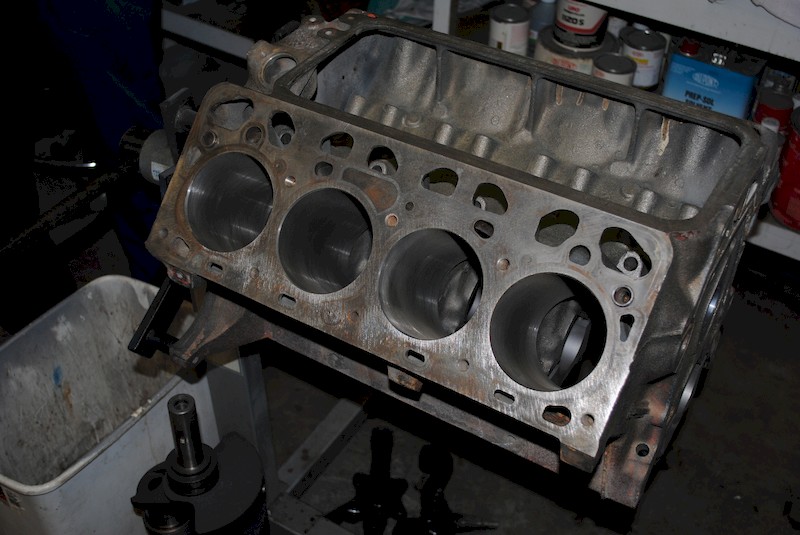
The 292 was hot tanked and then carefully scrubbed in preparation for a lot of internal work to enhance its horsepower and torque output.
Restored Factory Stock Y Block With Ford 4100 Carb
Before I decided to go nearly all-out to build a souped-up Y block that would easily run with a 390 FE engine, Mike Smith built the engine into a visually factory stock configuration though, as detailed in earlier text on this site, there was a good amount of “internal” work that would have awakened up the performance of the engine.

While untidy from sitting for decades unused, this carb has unusually large venturies and other details that distinguish it from the Autolite carb that was fitted, for instance, to the 1958 Thunderbird.
Restored Factory Stock Y Block With Ford Holley Carb
Another carb authorized by Ford was a 4-V Holley carb. Check out the appearance of a vintage, date-coded Holley liberated from a crushed ‘57 T-Bird that I found in a junkyard about 30 years ago (I may sell this carb to a Thunderbird restorer).
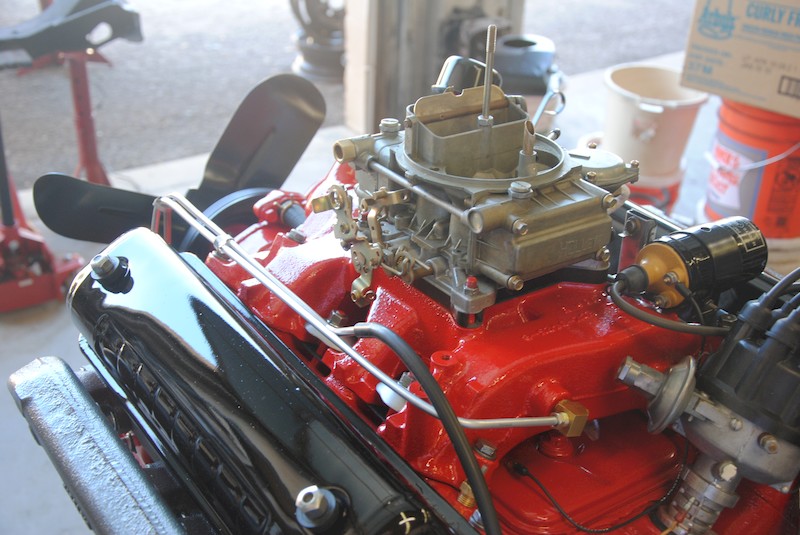
The ubiquitous Holley carb was also mounted on the single 4-V intake on the ‘57 Ford.
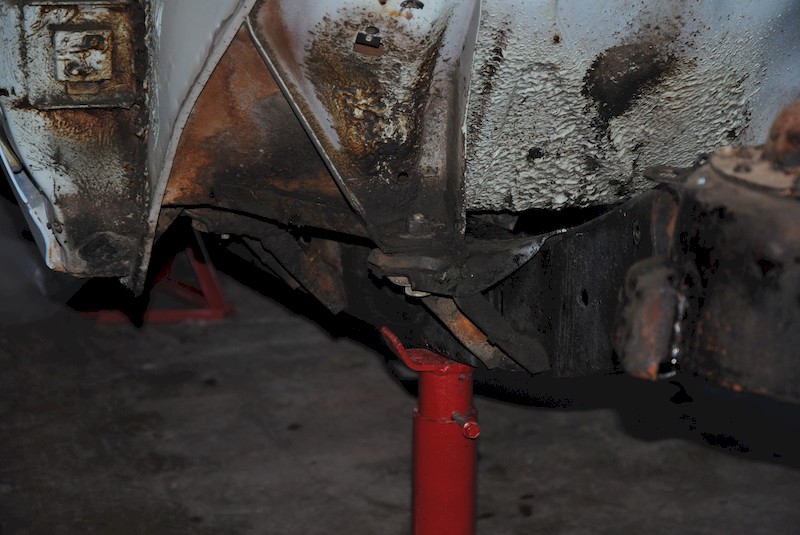
Frame:
Because both the factory-authentic scale replica Vicky model and the model of the phantom styling study will be constructed in the same basic way as its 1:1 counterparts, we must fashion a frame onto which the integral body and floorboard can be dropped. This means that the frame of the model must be solid, accurate and fit the floorboard like a glove – in the same way that the full size frame does.
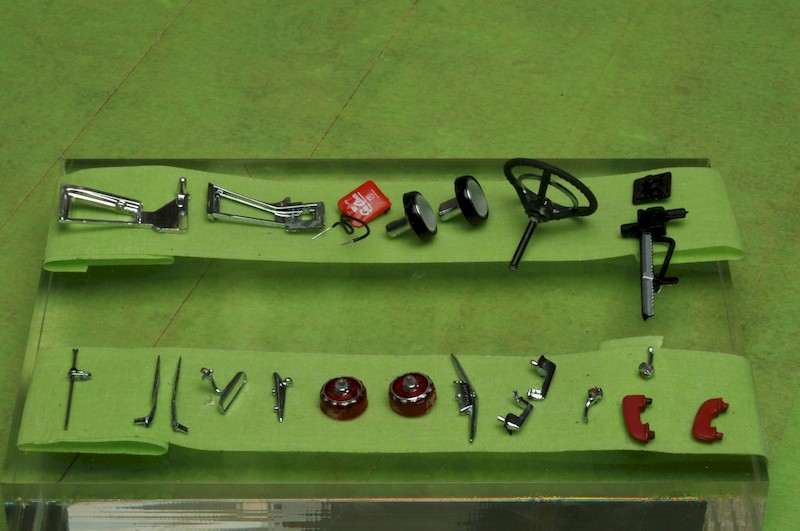
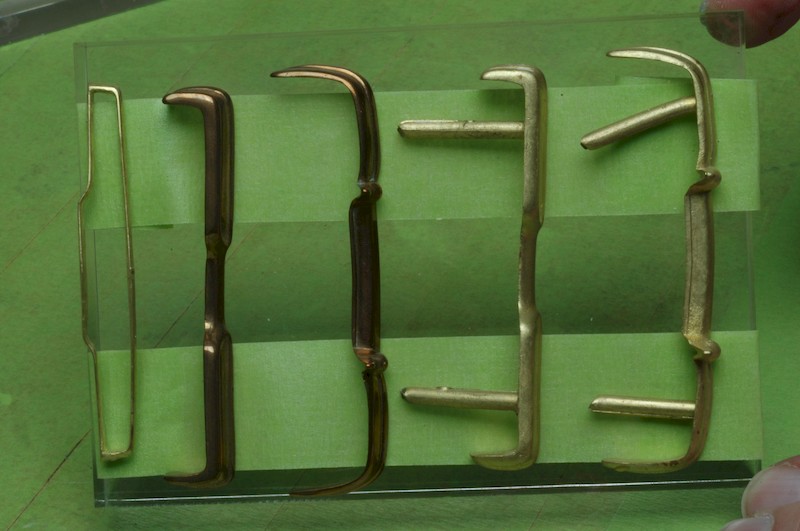
A discarded Danbury Mint model of the 1957 Ford Skyliner yielded these parts after a lot of careful work to retrieve these parts without breaking them. Seen here (starting at the top), we’ve retrieved those great vent window assemblies, a “See Clear” windshield washer bag, windshield wiper arms, door handles and arm rests. These are great parts and will be freely used.
For the replica model, I’ve already had the AMT kit bumpers (once corrections were made) cast in brass. I’m in the process of polishing them now for cobalt plating.
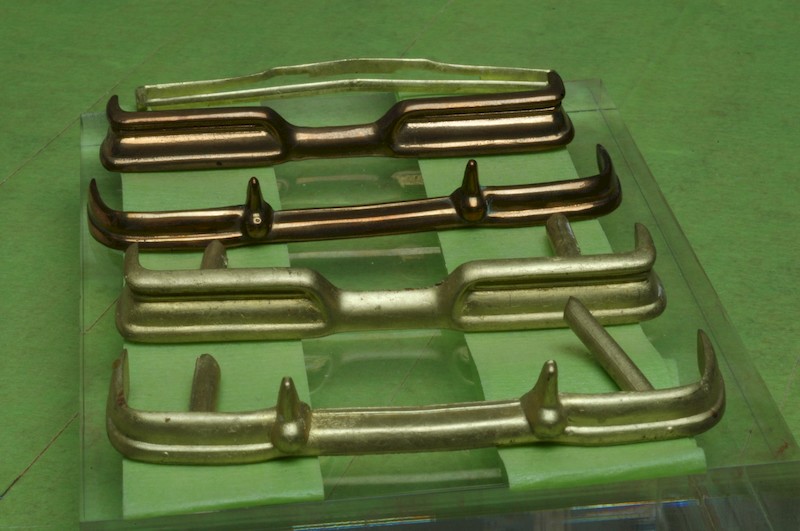
I’ve modified original AMT bumpers and had then investment cast in brass, along with the front grille surround. I’ve started to polish the best-of-the-lot front and rear bumpers. Much more work needs to occur before these parts can be cobalt plated.
The Revell ‘57 frame, though fashioned for the short wheelbase Custom/Custom 300 body, in fact can be used in for the longer-framed Vicky body with a few changes. One obvious change will be to add proper coil spring “towers” at the front of the frame, and we’ll need to stretch the kit frame a bit. The hard angle atop the frame, two-thirds back from the front as it starts to arch over the rear axle, will also be corrected. Once accurized, the frame will be used as a template to create a photoetched frame kit (a series of shapes) that can be soldered together as I did with a 1/25 scale 1932 Ford frame. The photoetched parts, including the frame, may be offered as a kit, but the corrected plastic frame will be resin cast.
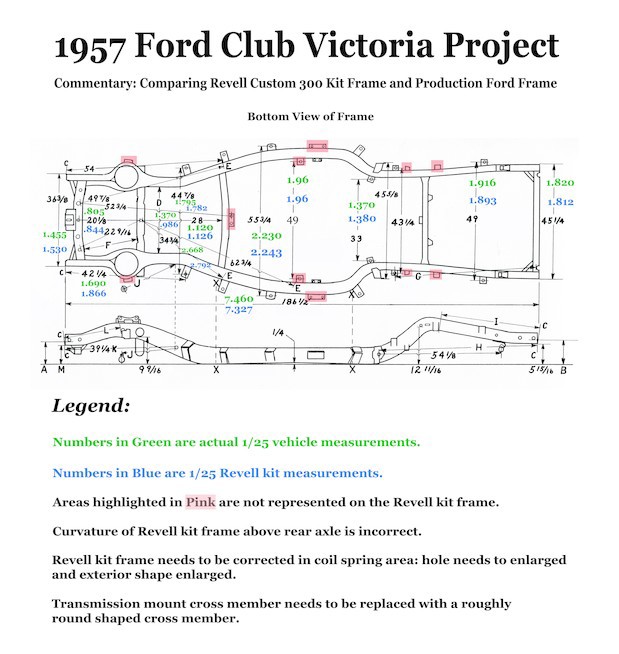
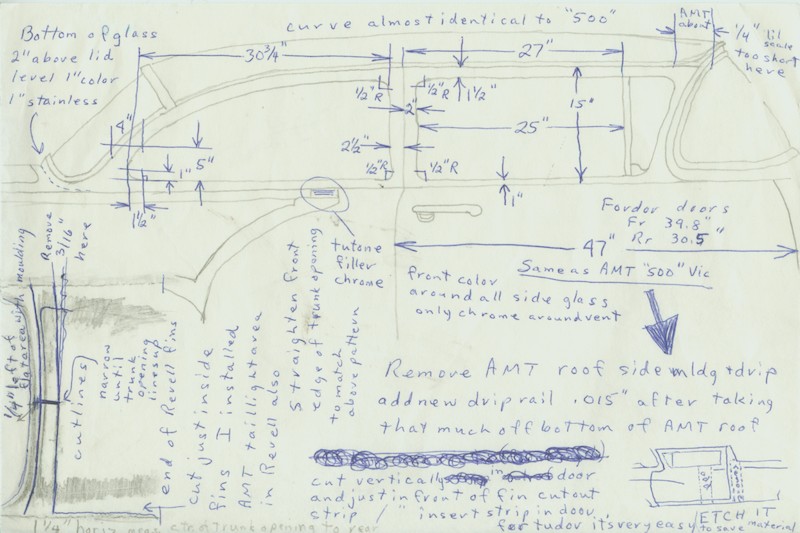
Here are the measurements of the factory frame based upon actual dimensions taken from my Club Vicky taken by Wayne Egbert and Mike Smith. Thanks to Steve Roullier for preparing this illustration. Be sure to check out the legend.
Suspension:
The front suspension is a key part of the model. We’re going to use the upper and lower control arms from the AMT 1960 Starliner kit, modify them, and then have them investment cast in brass after which the control arm surfaces will be machined to accept the control arm bushings that Cody machined a decade ago.
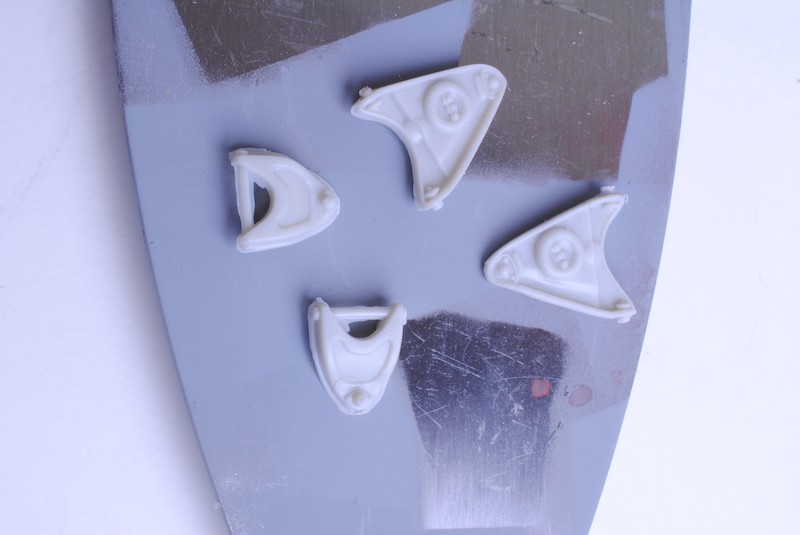
These 1960 Starliner kit parts are the most authentic on the market, due in no small measure to the fact that superb Ford expert Bill Bozgan consulted with AMT when the Starliner kit was under development. Work needs to be done to fully-accurize these parts.
It’s obvious that the location of the ball joint is not placed equal-distant between the control arm pickup points. Note how the flat flange on either side of the control arm pivot points aren’t the same, side-to-side. The AMT 1960 Starliner parts pick up this important detail very well.
The underside of the upper control arm reveals some fairly intricate shapes. Note how the angle of the “vertical” on the right side of this image angles so strongly toward the ball joint.
The lower control arms show that the center point of the coil spring are off center to a perpendicular line between the ball joint location and the control arm pivot points.

Check out the details seen here. Even the excellent ‘60 Starliner kit parts will need additional work to achieve this detail. All of these parts were chemically stripped of awful built up grease and original thin factory paint.
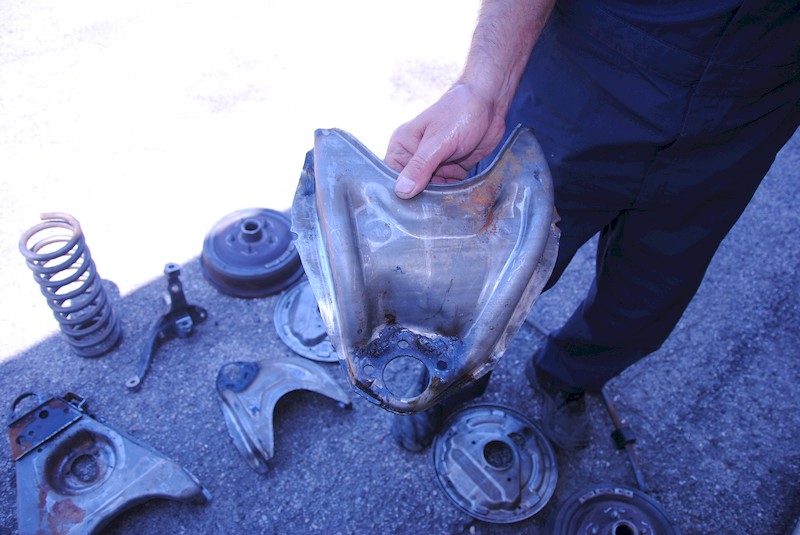
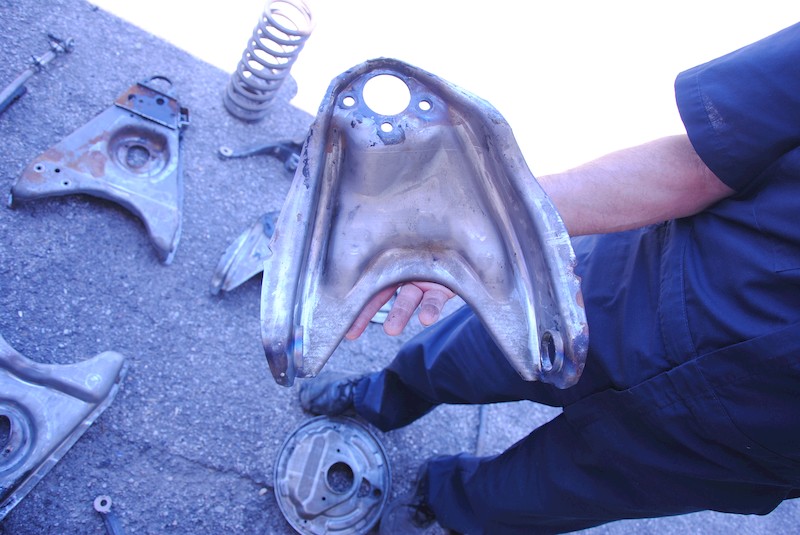
Firewall:
One area in which both the AMT and Revell ‘57 Ford kits are weak is in the firewall. The vintage AMT kit’s firewall is little more than a flat panel and, while the Revell firewall is more detailed, it isn’t an entirely accurate firewall either. Therefore, we’re going to substantially modify the Revell part using the dimensions and photos we took of the 1:1 car after we pulled the front clip. Thanks to Steve Roullier for digitally placing the measurements on the photos taken by Mike Barlow.
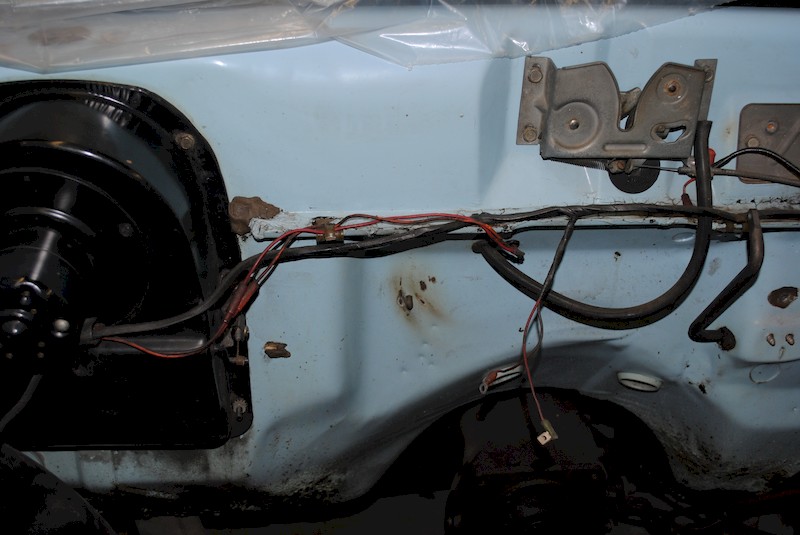
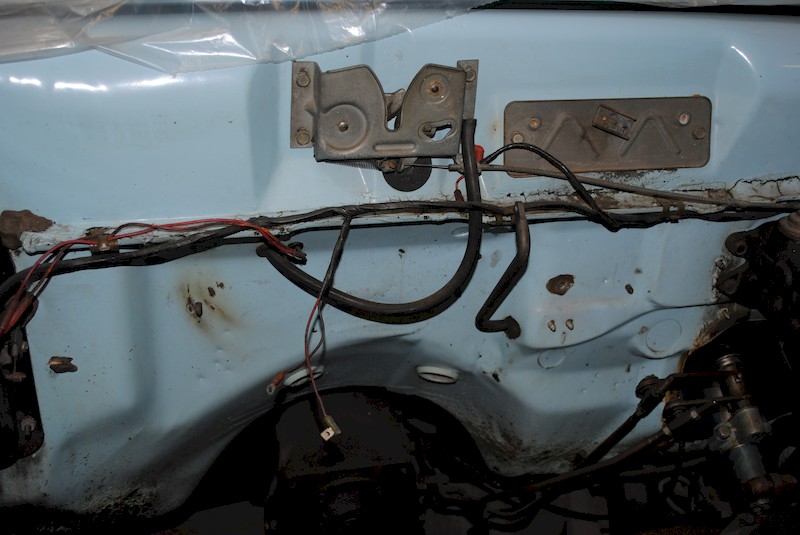
With the front clip, suspension and sheetmetal removed, the majesty of the firewall can be seen. No part from any kit accurately portrays the firewall. We’re going to create an authentic firewall (with a separate heater core cover), and then send it to famed resin caster Don Modelhaus (along with a lot of other pieces) for resin casting for the models I’m building.
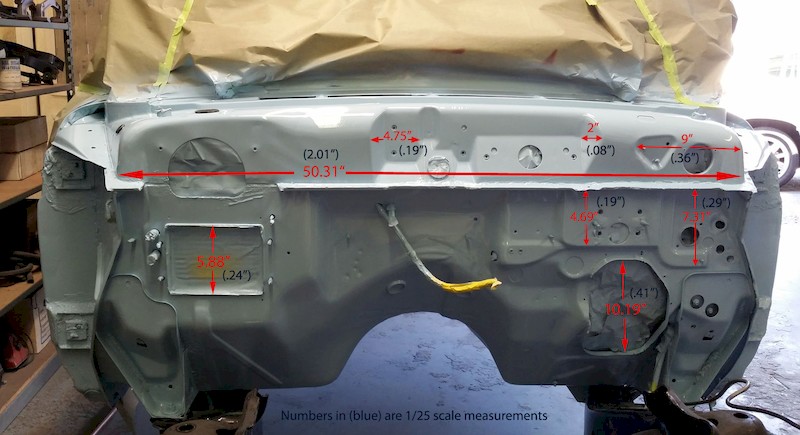

With the front of the car on jackstands, Project Assistant Wayne Egbert and Project Mechanic Mike Smith took these measurements. Steve Roullier digitally dropped their measurements onto photos of the 1:1 firewall. These dimensions will be essential to building a correct 1/25 firewall.
Project participant Steve Roullier has created a series of dimensioned illustrations based upon measurements that I took of the Ford’s firewall.
Sheetmetal
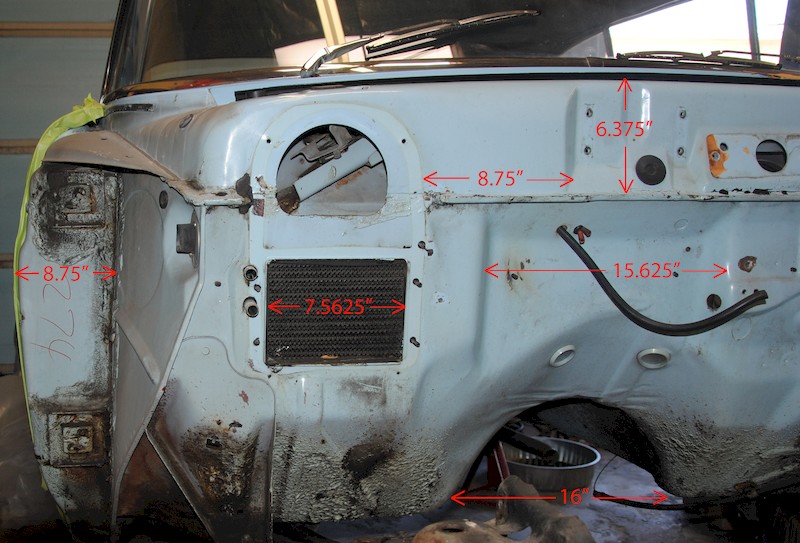
Both the AMT and Revell kits are pretty good in their portrayal of the front fenders, hood and the inner engine compartment panels of the ‘57 Ford. Nevertheless, examining the real car reveals some interesting details that don’t appear in either kit. Take a look at these pictures:

This detail is strongly hinted at in the Revell kit, and barely shown on the AMT hood. I’m going to hammer the exterior shape from .020 brass, and then add the inner shapes but cutting away the Revell hood inner structure and correcting it a bit. The hood will be cast by The Modelhaus.
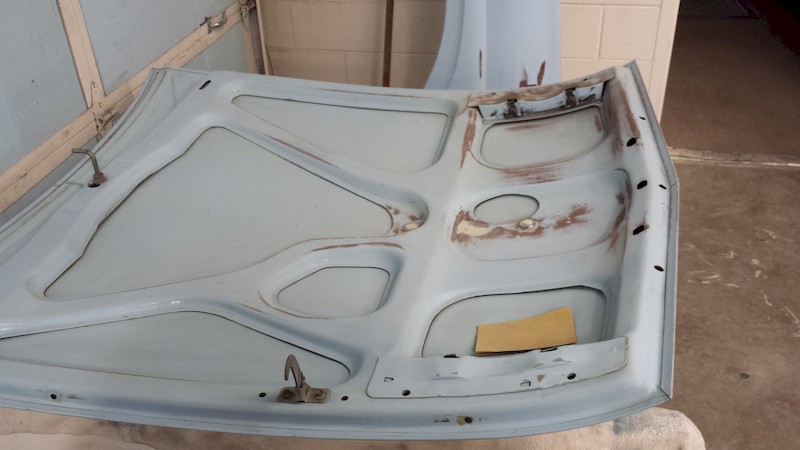
Look at the very thick structural shape at the leading underside of the hood. I’ll make this part from brass and then drill the six holes shown. Lots of great detail to pick up here. Given the location of the hood hinges that will be made from brass and will need a strong mounting surface, much of the underhood detail will be made from brass.
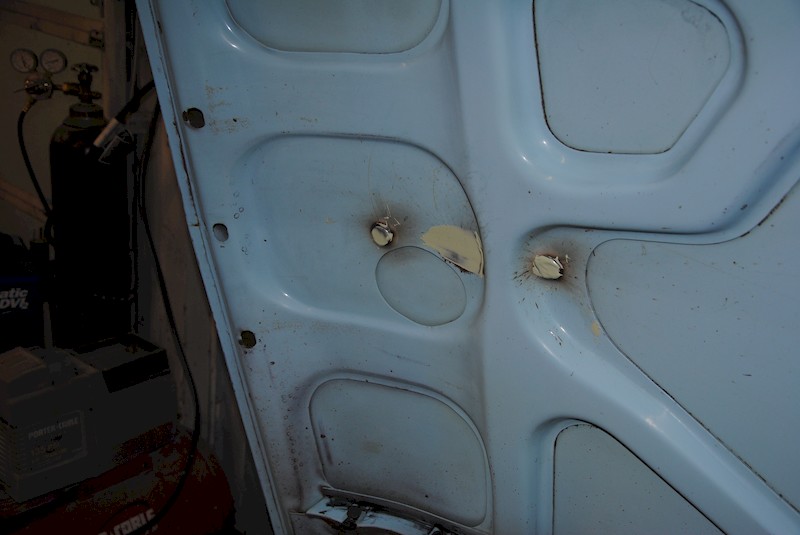
Though this hood shows where George Layton welded up the holes for the top-of-hood gunsight, we’ll depict those holes plus the curious round shape. There’s no reason that the bottom of this hood can be very scale-authentic.
With the fenders off the car, one can see the plentiful inner-fender details which, of necessity I suppose, are omitted from both the AMT and Revell kits. These details will be added to master parts that will, in turn, be resin-cast by the Modelhaus.
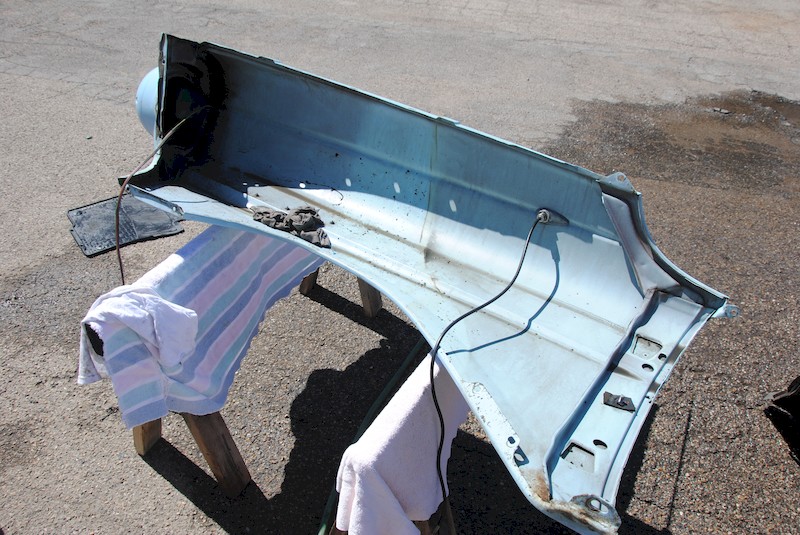
The trunk floor will be modeled. No kit has portrayed this area because an open trunk has never been featured in any kit.
The inner rear quarter panel areas and the taillight will also be modeled. Check out the rich opportunities for detailing!
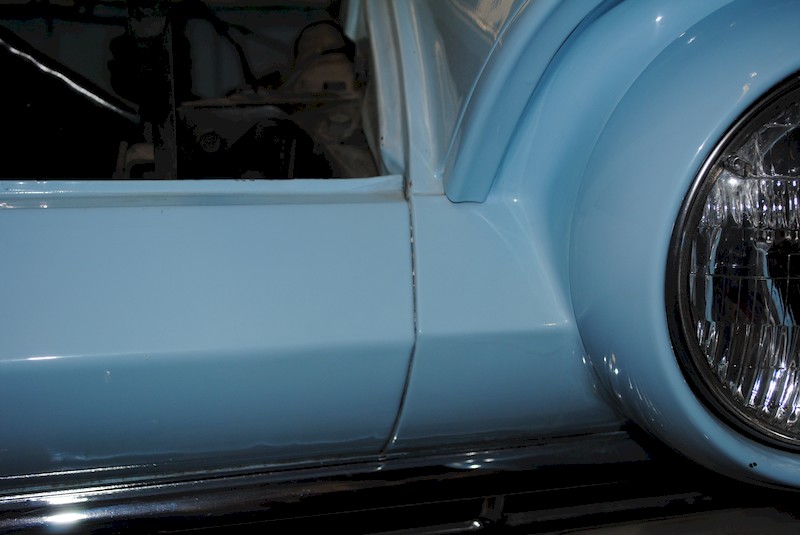
These subtle details are hinted at in the excellent Revell kit, but the area could be developed a bit more. Look at how the panel break lines up with the inner edge of the front fender.
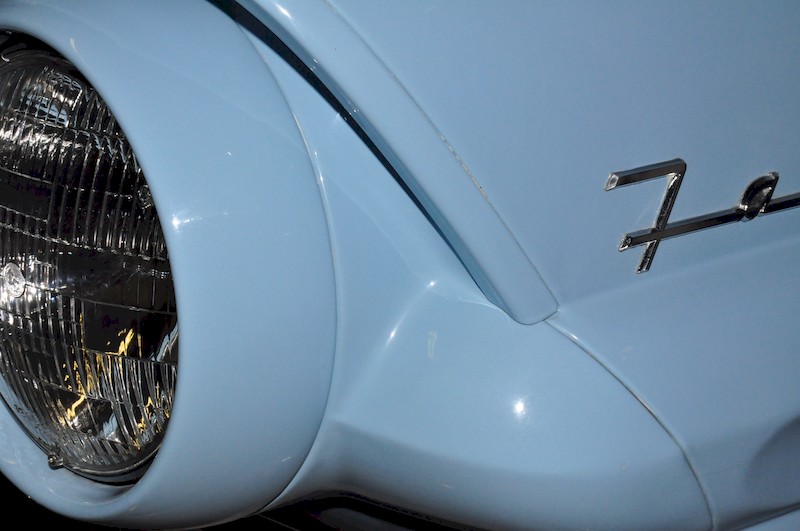
The eyebrow over the headlight has squared-off edges; its width sits even over the panel that divides the front sheetmetal from the side of the fender.
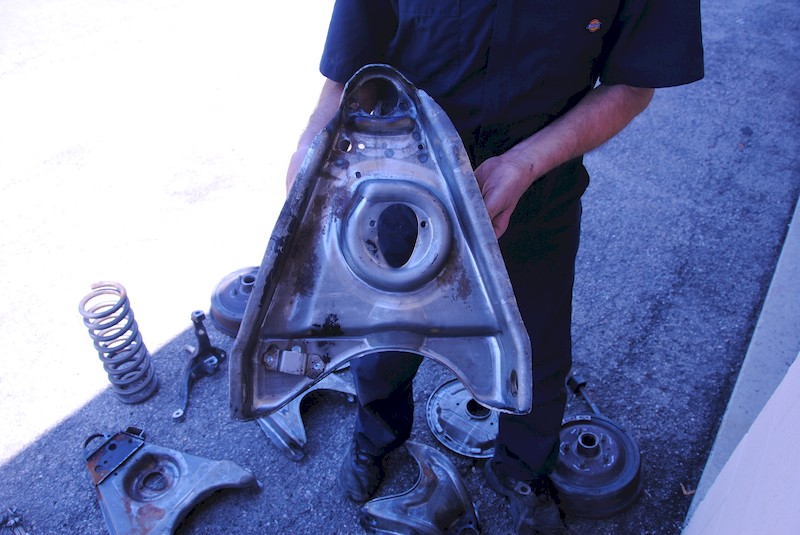
The front gravel shield has a break on either side of the panel, just around the corner the factory part is comprised of three parts. This panel is a separate item, not part of the front fenders or the front of the frame (neither the AMT nor the Revell kits have done this right). Note the side of the front grille seen here in the upper left.
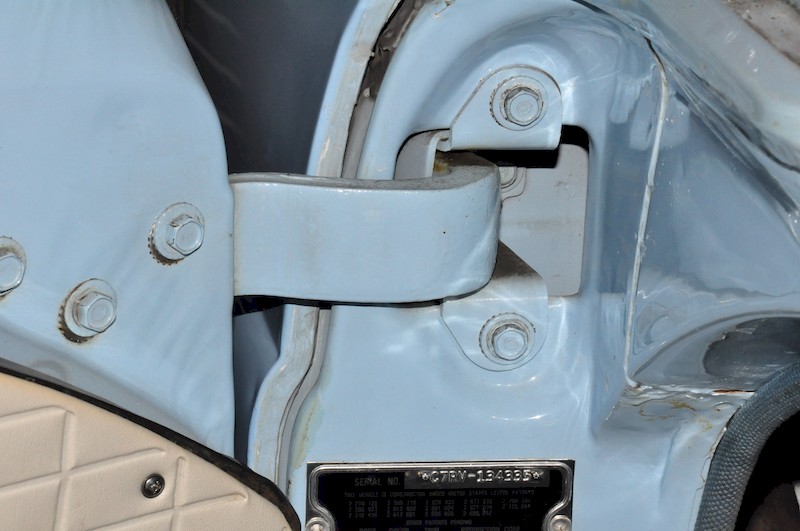
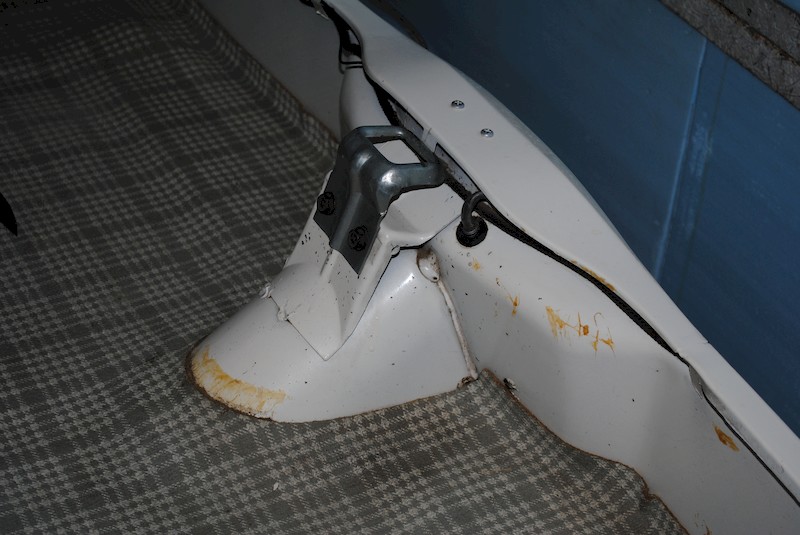
The upper door hinge area is very different from the AMT kit which is quite crude: the Revell kit does not portray opening doors. Note how the fenders fits around the bulk head and note the heavy body structure on the right that sits under the windshield “dogleg.” The data plate is seen on the center bottom of this image. If a builder is going to show opening doors, this area needs to be properly represented in scale.
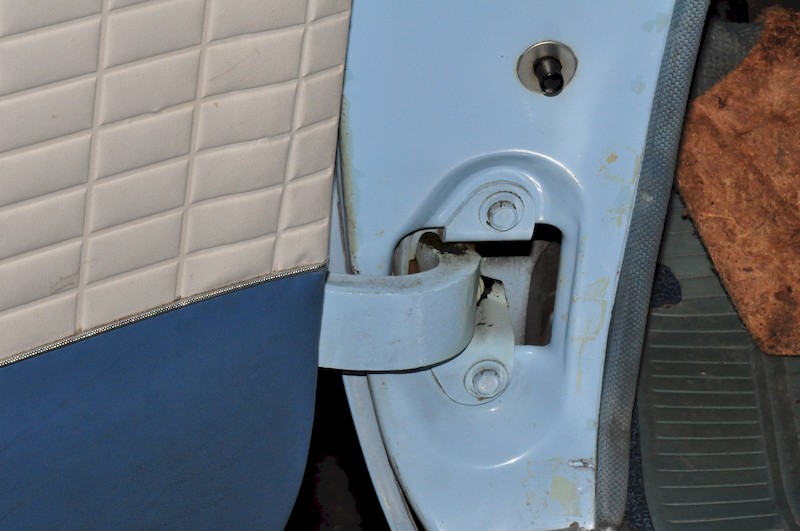
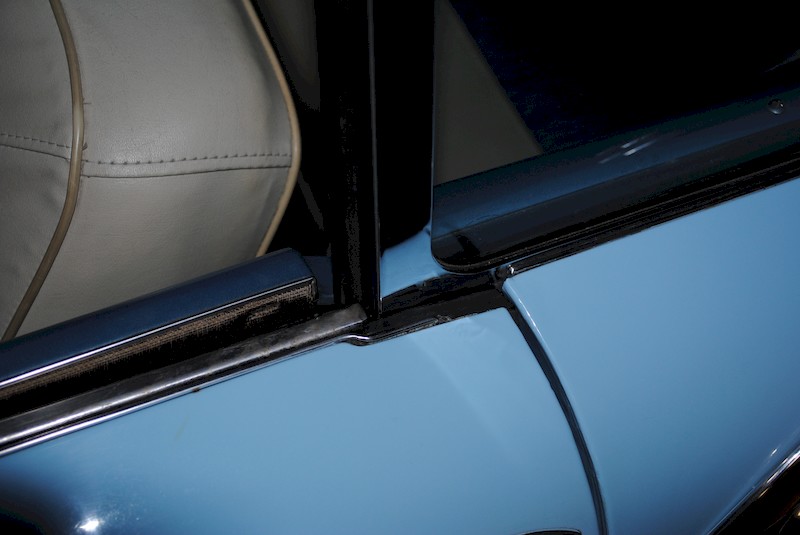
Here’s the lower door hinge area. The door hinges bolt through the bulkhead. Check out the interior courtesy light, the waffle board door panel, and the silver/plastic part that separates the blue panel at the bottom of the door handle and the patterned door panel.
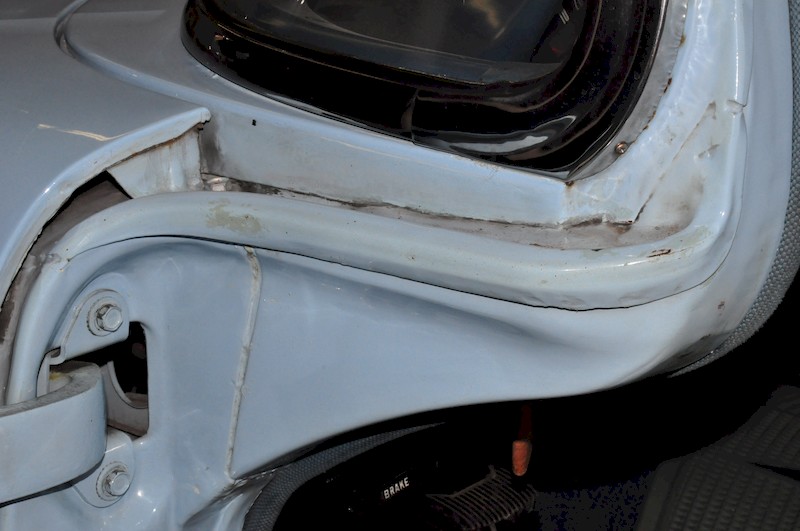
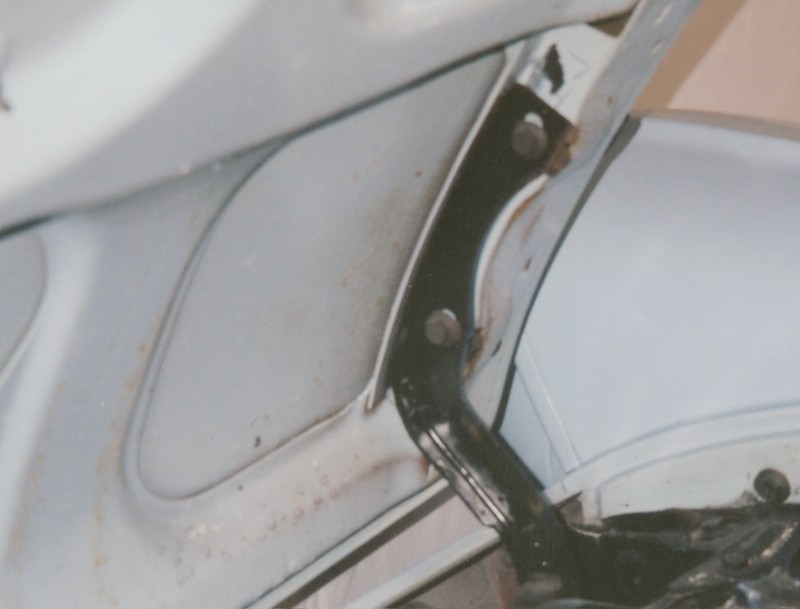
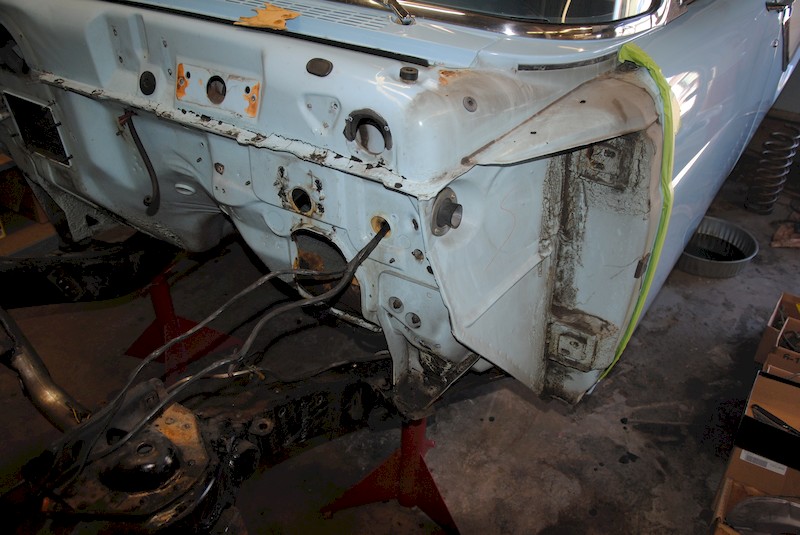
Here is the body structure directly under the wrap around windshield. Note where the fender bolts down, and the elevation of the upper door hinge, and the hint of the flange tab coming off the trailing edge of the fender that permits a bolt to attached the fender to the bulkhead, thereby securing and locating the top of the fender.
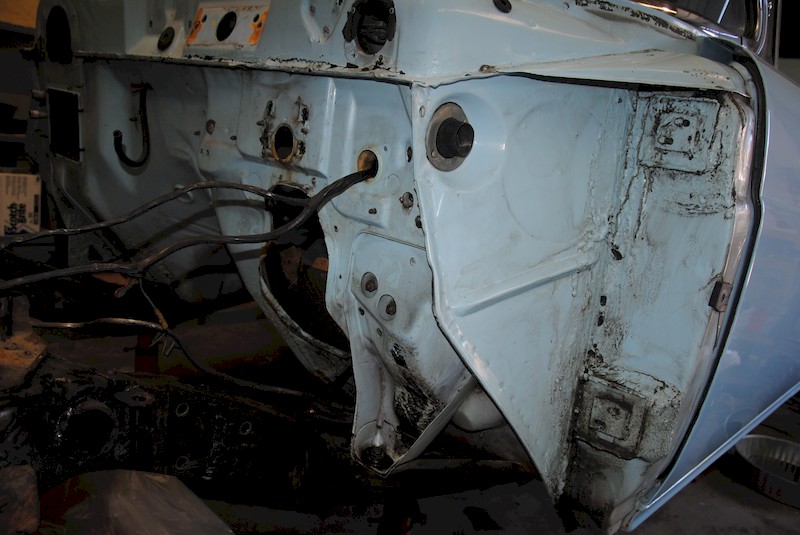

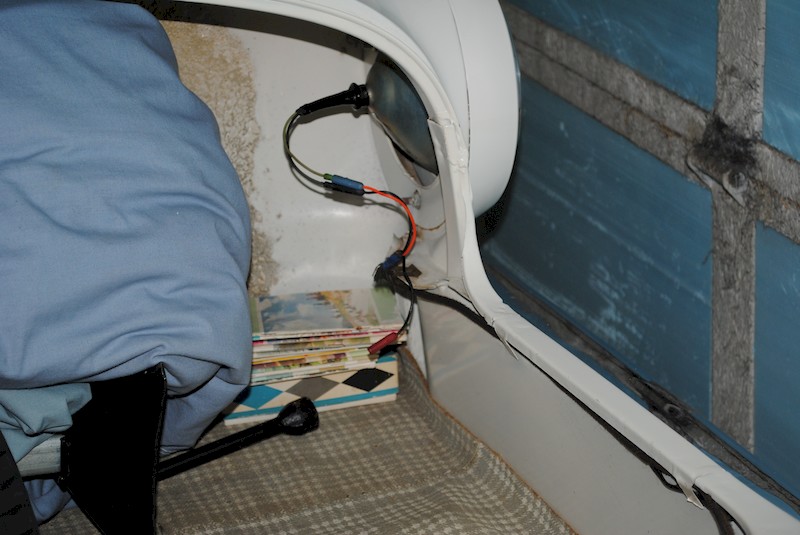
Check out the bulky bulkhead through which the four door hinge bolts (two, upper; two, lower) pass.
Once cleaned, the bulk head (here, the passenger side) can be clearly seen and measured for a detailed model.
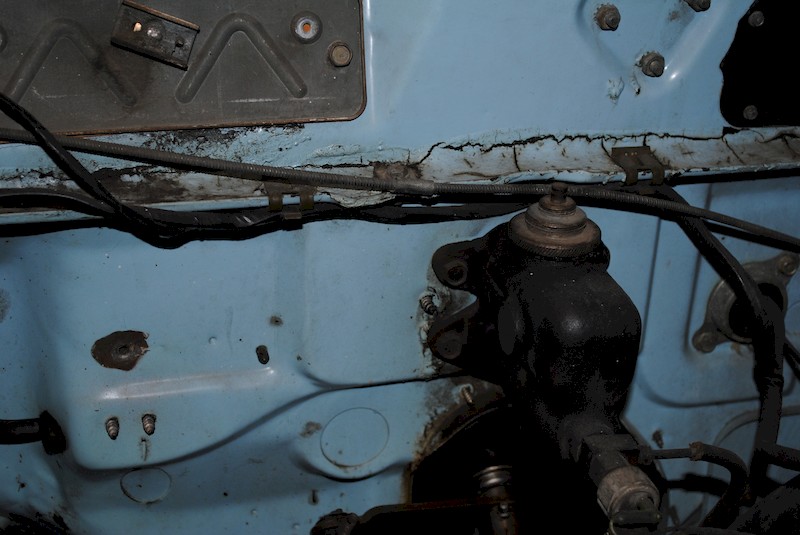
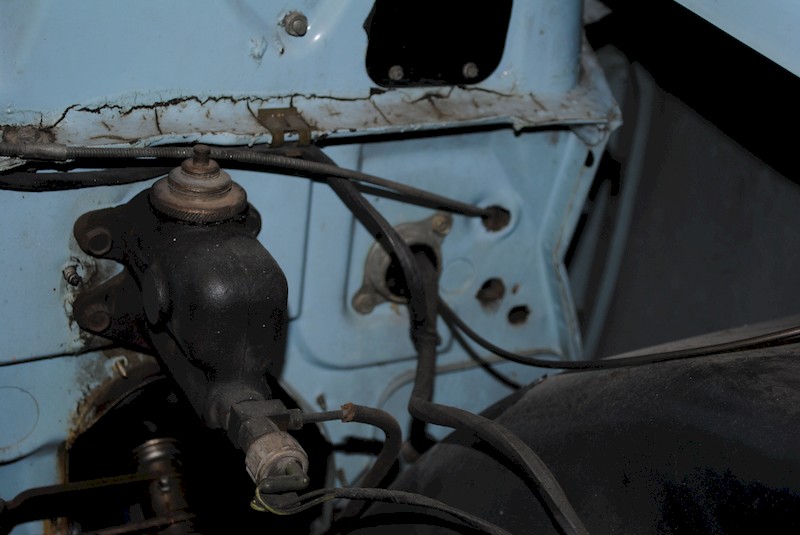
The panel between the headlights is thin and exhibits a strong inner concave shape that is open of necessity to host the forward part of the hood hinge – – this part must be made from brass to be strong enough and scale-thin enough. Note that the hinge bolts to the radiator support as does the radio, and the two horns, the fenders (through the bracket that can be seen at the bottom of this image).
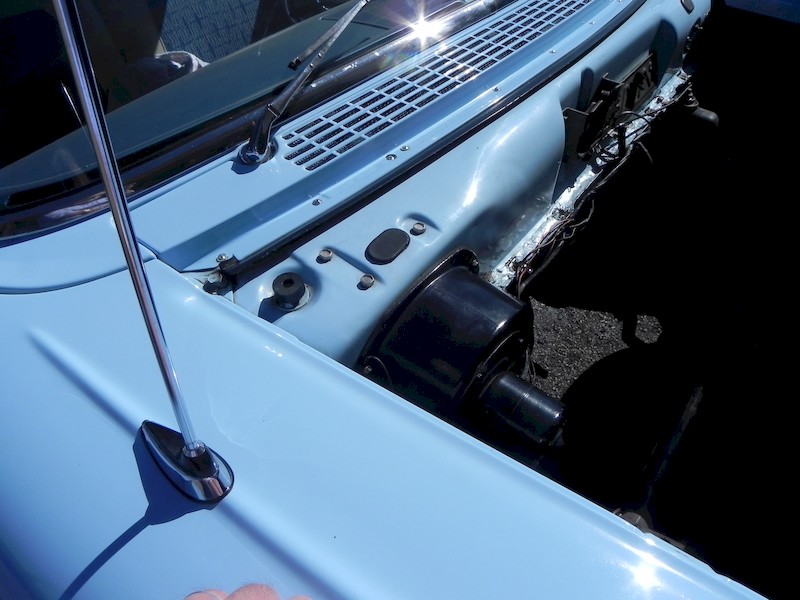
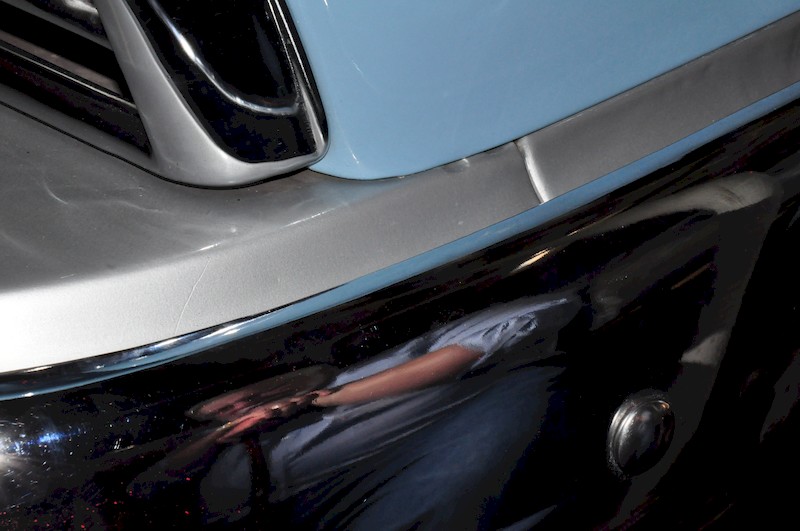
Before disassembly and after, the interface between the fender, the cowl and the body painted bulkhead can be seen here. The firewall, as you can see elsewhere on the site, is rich in odd detail and shapes. Check out how strongly recessed the hood latch mechanism is.
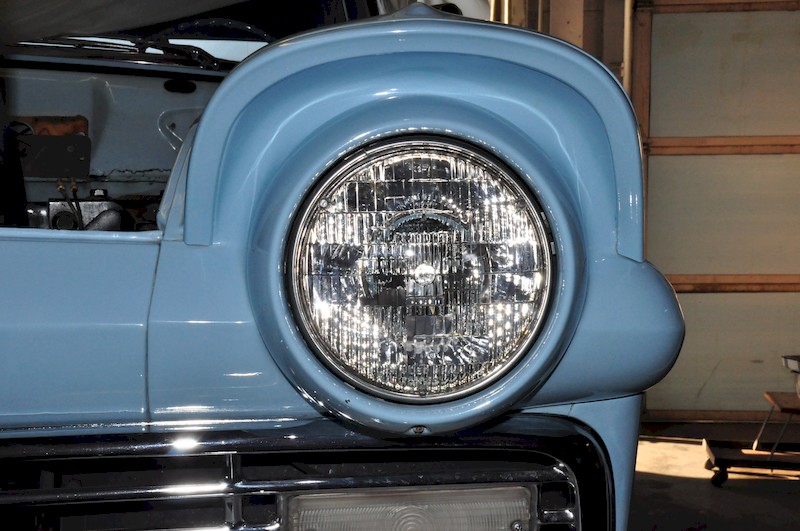
Here’s an interesting detail: the lower radius of the frog-eyed headlight shape hangs over the upper part of the grille.
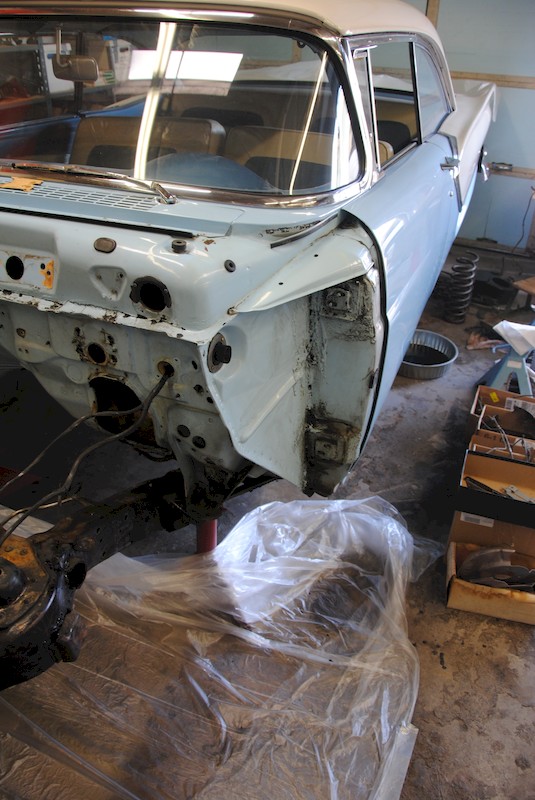
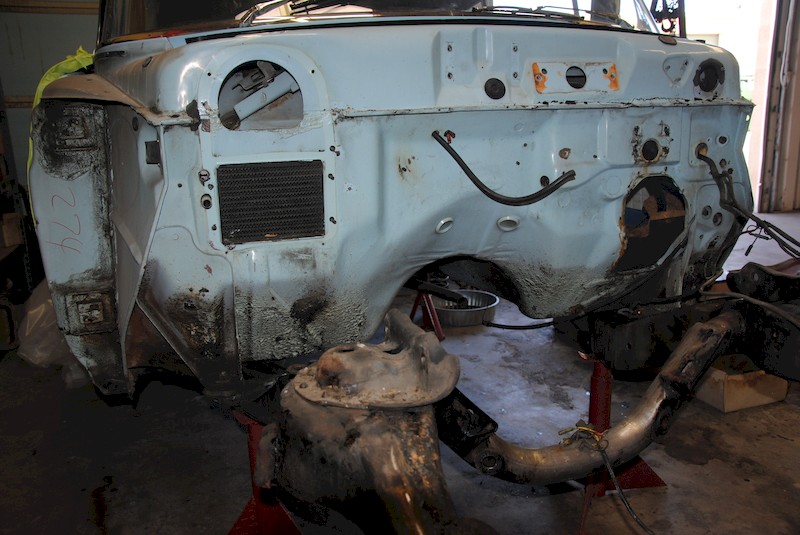
With the front clip and mechanical components removed, the interesting bulkhead can be seen. All of this detail must be modeled by a serious builder intent on building an authentic scale miniature and not just a model!
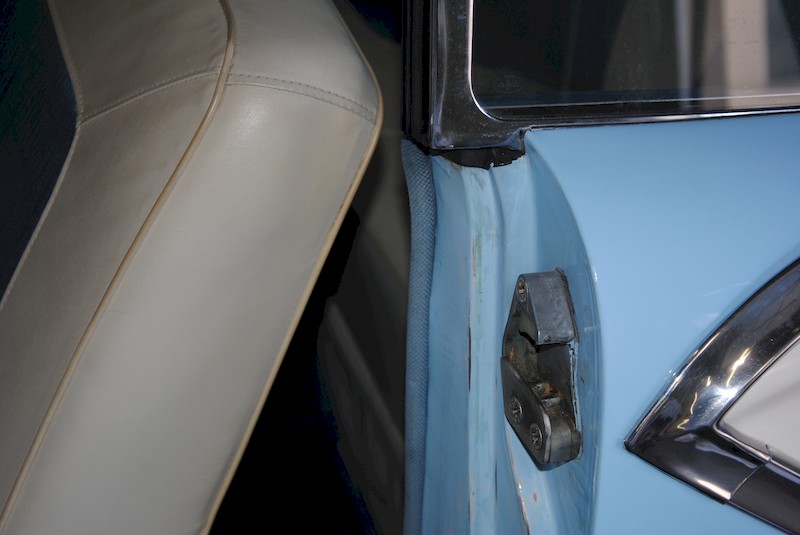
The AMT does a very poor job of modeling the door jamb opening (and the Revell kit doesn’t do anything at all in this area because opening doors aren’t presented in this kit). Note the worn windlace that will be replaced.
The front of the body bolts to the frame through this very heavy shape that emerges from the extreme lower left and right corners of the cowl. A single bolt plows through the mounting flange to the frame outrigger.

The overall frame can be seen here, albeit at a strong angle. Note the pinch weld on the upper third of the panel. Instead of cringing away from this area, think of the great opportunity for convincing detail is afforded with this information.
Now, this is interesting. The upper/rear edge of the outer door panel has this incut to accommodate the chrome rear quarter window frame when it is in the full “up” position: the detail is common to the Fairlane 500 coupe, also. When fully in the “up” (forward) position, the chrome frame fitted to the rear window crosses over the door line and “invades” the door. This is necessary because of how the door jamb is built – see immediately preceding photo.
The hood hinge areas are grossly inaccurate in both the AMT and the Revell kit and probably has to be rendered as it was in the both kits because those are mass-marketed.
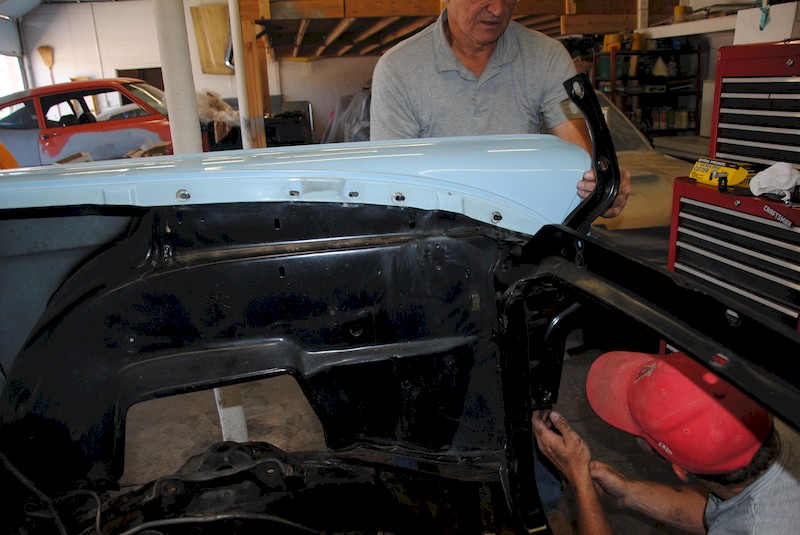
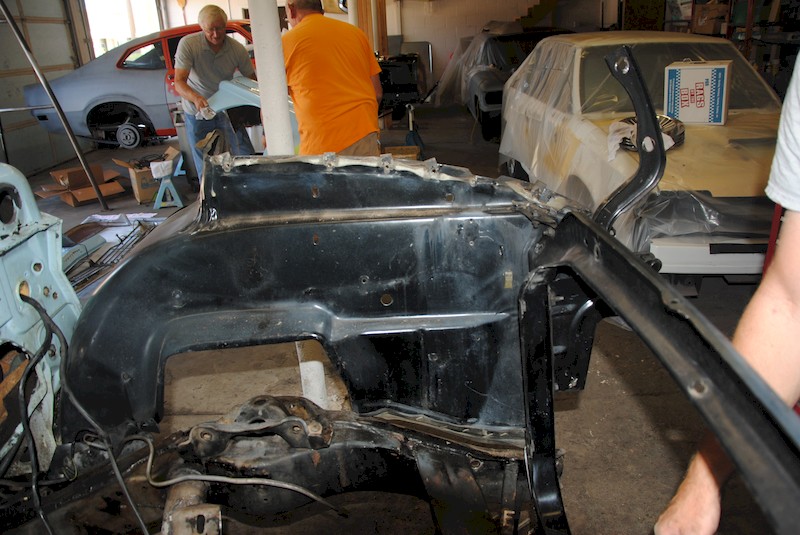
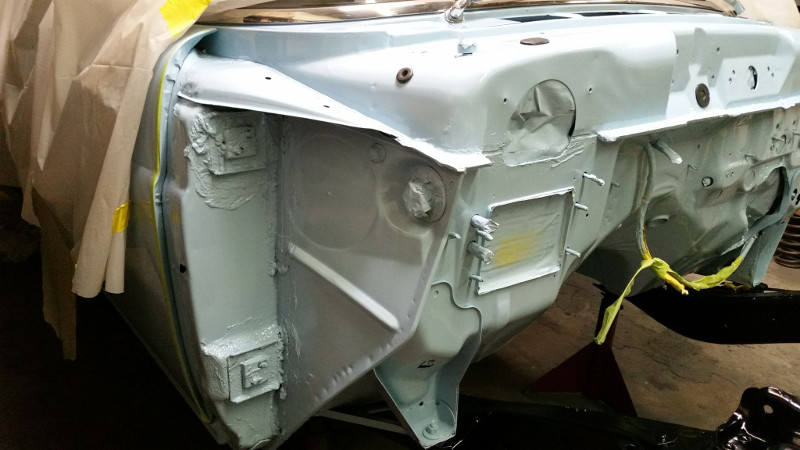
With the exterior sheetmetal about to be removed gently from the car, the full shape and measurements of the inner compartment panel can be seen. The engine compartment panels will be stripped of the factory rubber strips (which kept parts from rubbing against each other and setting up bad squeaks), media blasted, and then powder coated in medium-gloss black. That’s Wayne Egbert (L) and George Layton hefting the fenders.
Here, the radiator support, related parts and the engine compartment panels have been removed and are ready to be disassembled for powder coating (after they are lightly blasted with glass media to remove the paint and the very light surface rust in a few areas).
Even though this photo is oblique, check out the rich detail of the real firewall. We’re going to try hard to replicate this shape on the models.
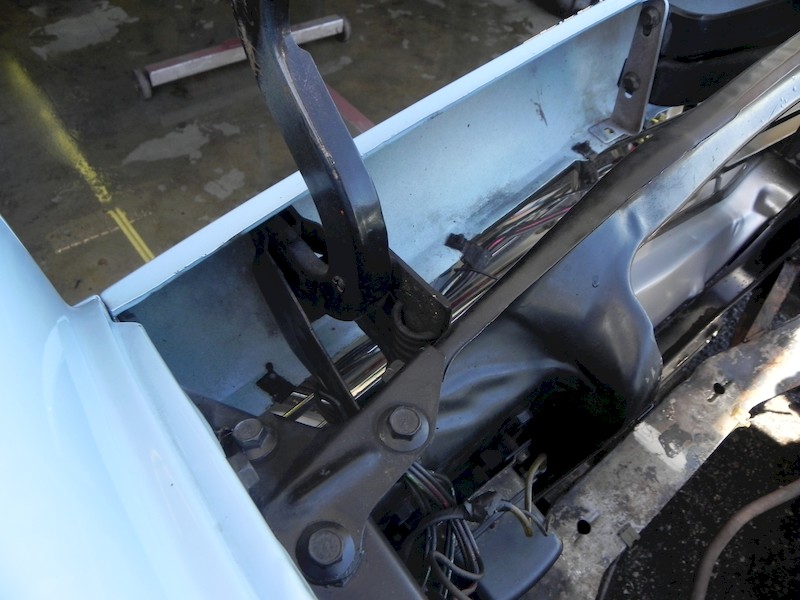
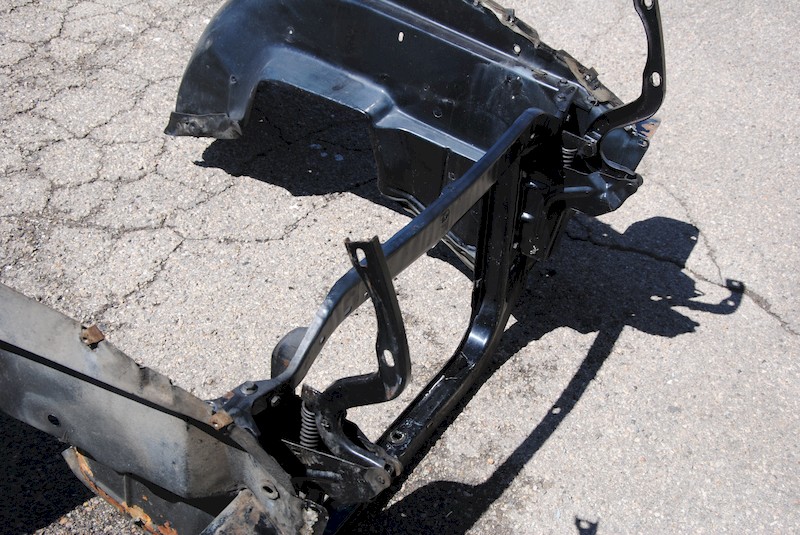
Check out what a hinge setup looked like in a body-on-frame configuration in a Fifties car. A sturdy bulkhead is penetrated by the hinge bolts.
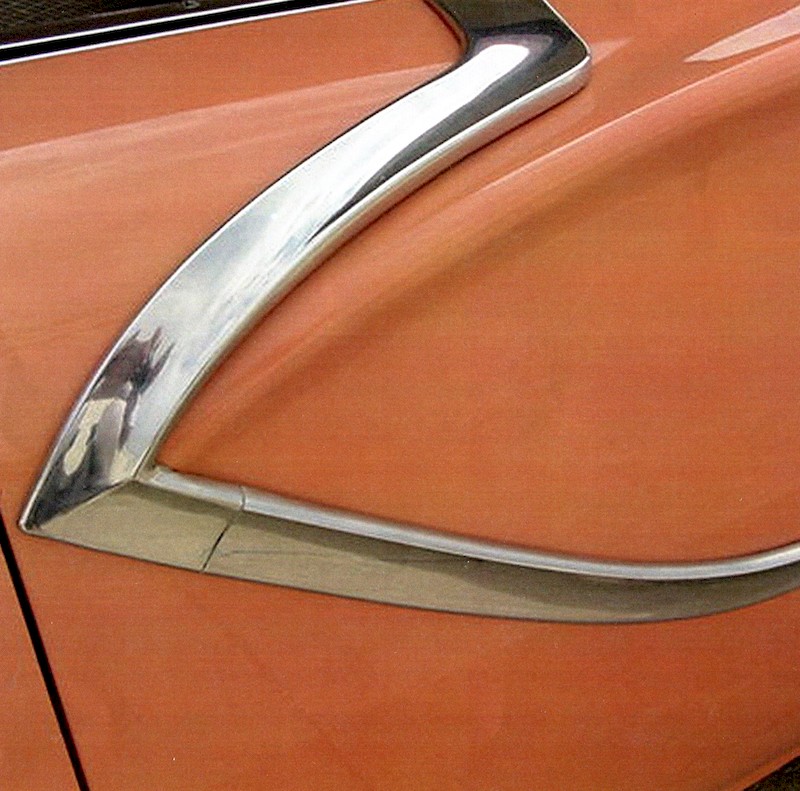
Probably the key defining characteristic of the Victoria coupe is the graceful rear quarter panel trim. With an actual car available, the critical shapes and location of the trim can be replicated in scale.